

Determining what to do when you go to the gym can be intimidating, regardless of whether you’re returning after a long absence or hitting the weight room for the first time. You may not know how to create your own fitness regimen without guidance from an outside source, even when the personal trainer you worked with a few years ago gave you great workouts to perform.
Fortunately, you may start working out at any gym, home or commercial, as long as you know what your objectives are and a few fundamental weight training techniques. This guide will assist you in identifying your fitness objectives and incorporating them into your initial training schedule. Additionally, you will receive a template for a four-week training program that you may customize to meet your personal objectives.
How To Build Your Workout Plan: 7 Steps to Get Started
- Establish a Goal
- Select a Workout Split
- Choose Your Exercises
- Choose Your Sets and Reps
- Learn About Progression
- One-Rep Max Calculator
- Put it All Together
1. Establish a Goal
Regardless of your degree of experience, it will be most useful to have clear goals from the outset when you are beginning your first training program. You may be searching for maximal strength or you may be trying to gain muscle. Your objectives may also involve weight loss, cardiovascular endurance, or a mix of these.
It’s acceptable to have multiple goals; this is what most individuals do. Even powerlifters, for instance, who prioritize strength, frequently like to bulk up their muscles. However, you should continue to be focused in some way. Putting your top priority objective first can help you create a training program that will keep you the most happy and interested.
Form a Habit
If you’re a beginner, creating a regular workout routine might be the primary objective of your program. Your techniques will therefore be less reliant on the particular health advantages they provide. Rather, ascertain your workout preferences and design your program on activities that you find fun and long-lasting. You can become more focused after you’ve developed a solid workout habit.
There is a lot of potential for creativity in all these tasks, but creativity needs to be trained with logic and expertise. That’s when the programming becomes hazy. After you have a firm grasp on your primary objective or objectives, you will be prepared to dive deeply into the specifics of designing a training program.
2. Select a Workout Split
Choosing how to divide up your program day by day is called a workout split. The types of exercises you perform and when you perform them are determined by these splits. This is a critical part of planning your turning so you can improve steadily while managing your energy and recuperation.
For instance, you shouldn’t perform extremely heavy squats two days in a row unless you’re following a very particular and advanced training program. Both your squatting muscles and central nervous system will be damaged.
Furthermore, the daily operations of your program influence the aim that you prioritize. You generally won’t create a program centered on steady-state running if your goal is to develop muscle mass, however if you know how to incorporate running into your lifting regimen, it’s not a bad idea.
Days Per Week
There are numerous approaches to setting up a split workout. Nevertheless, it’s a good idea to know how many days you’ll be training.
The frequency of your training is a crucial factor to consider when creating your exercise regimen. Think about how many times a week you would like to work out. Select a frequency that makes sense given your available time and energy. The most popular split times are three, four, and five days since your muscles require time to heal.
The next thing to do is to plan out your daily schedule. Your split’s focus will be determined by your goal.
Muscle Group Split
Consider targeting certain muscle areas throughout each workout if you’re trying to gain muscle: train your triceps and chest on one day, your legs and shoulders on the third and last day, and your back and biceps on the first. An optional fourth cardio and core day could also be scheduled.
Bodybuilders that want to gain as much muscle as they can use this strategy. During an exercise, concentrating on just two body parts enables you to hit each muscle with a higher total volume for the best possible growth.
Exercise Split
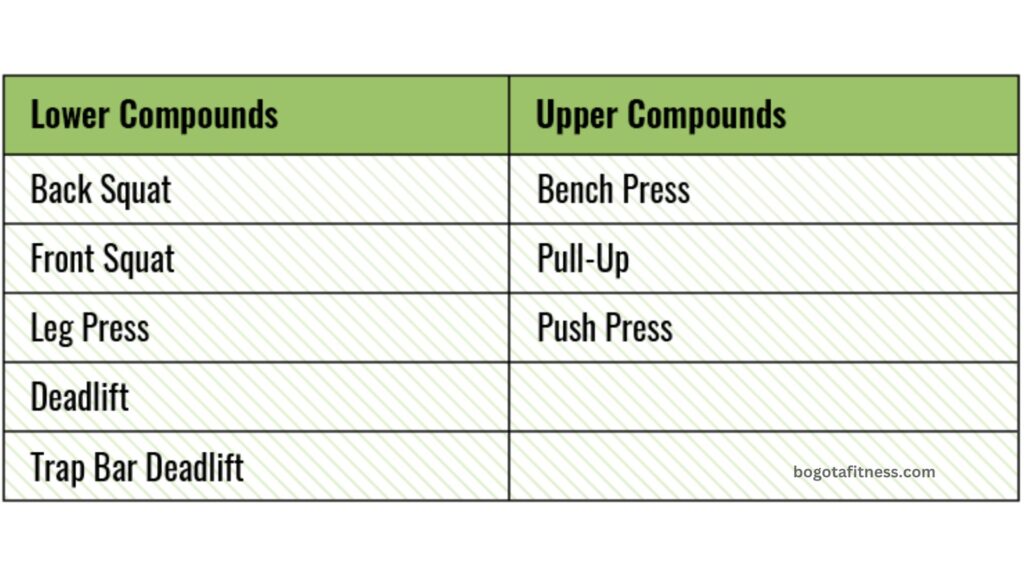
Your main compound exercises may be the focal point of a training split if your goal is to increase strength. Thus, you would dedicate one day to the bench press, one to the squat, and one to the deadlift. Powerlifters frequently create their programs in this manner.
You can also fit the overhead press into its own day if that’s what you want to do. Additionally, you can pair up the actions of your upper and lower bodies. These will be the foundation for all of your accessory training, which consists of exercises designed to strengthen your primary lift for the day.
Push-Pull-Leg Split
This technique can also be somewhat modified by doing an upper-body push day, a lower-body day, and an upper-body pull day. This is known as the push-pull-leg workout split. Thus, you would do the squat on the leg day, the deadlift on the pull day, and the bench press on the push day.
On the day of the push, you are also free to perform an overhead press. Since the deadlift, back squat, and bench press are naturally emphasized every day, powerlifters also frequently choose this option. Depending on whether your accessory exercises are push, pull, or leg-oriented training, you’ll select them appropriately.
3. Choose Your Exercises
After figuring out your split, you must decide which exercises you will perform every day. Your main objectives should be reflected in the exercises you select for your program.
If you want to become a strength or powerlifter, focus your training on the major barbell lifts involved in your sport. Your other workouts, which are referred to as assistance or accessory exercises, will reinforce those lifts.
Those fundamental compound exercises are still beneficial for athletes who wish to bulk up. Generally speaking, you will be using more muscles for larger movements. To give each muscle the attention it needs to grow, however, you’ll also need to vary your workout routine in order to achieve muscle growth.
Compound Exercises
It helps to know the components of compound workouts so that you can make better sense of the exercises you choose. These multi-joint exercises call for a high level of brain drive, concentration, coordination, technique, and muscle recruitment. Consider performing overhead presses, clean & jerks, squats, and deadlifts.
You should schedule these exercises at the start of your workout for these reasons. If not, you’ll be too tired to give them your best effort, which could result in damage. The most basic compound exercises that you may select to begin your training with are listed below.
Since compound movements are the most effective in your training, you should devote the majority of your time and effort to strengthening them. Not to add, these movements need to be strong because they are your competition movements if you are a potential competitive strength athlete.
Accessory Movements
Accessory lifts are less strenuous exercises that improve your body’s equilibrium. They go well with your complex workouts.
Exercises like barbell curls, lateral raises, and triceps pushdowns are examples of single-joint exercises. Accessories are used by athletes to correct muscular imbalances and deficits. The targeted muscle groups gain additional volume from these exercises.
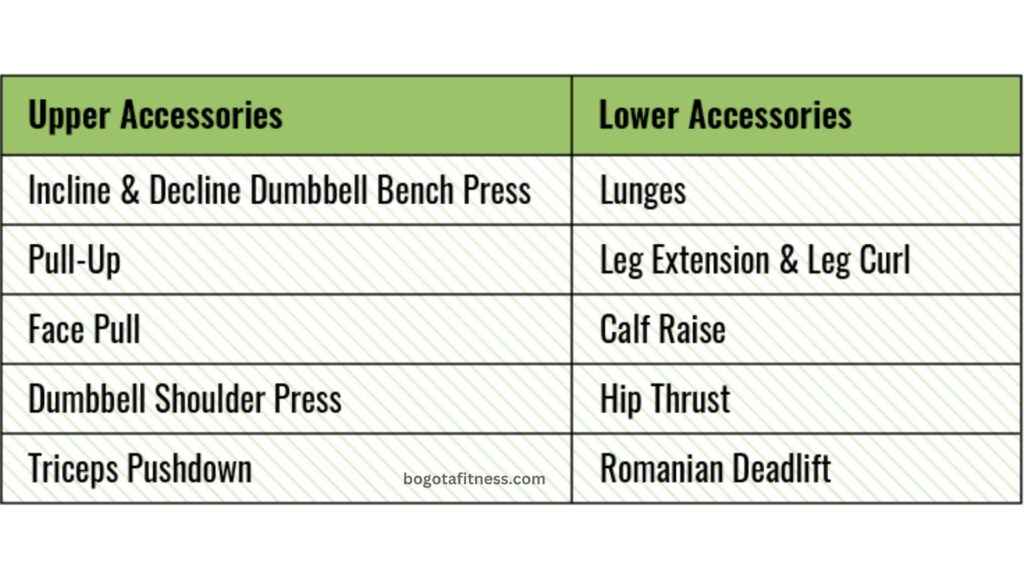
Complementary exercises are just as crucial for muscle building as complex lifts. Examples of auxiliary movements for the upper and lower bodies are shown above.
While different strength sports and athletes will call for different accessory lifts, it’s crucial to learn as much as you can about the range of movements that are accessible to you when you’re just starting out.
Also Read: STRENGTH TRAINING FOR WOMEN: EFFECTIVE EXERCISES AND BENEFITS
How to Program Your Exercises Into Your Workout Split
In summary, to maximize muscle recruitment and strength, begin each session with compound movements following a dynamic warm-up. Yes, even if gaining the most muscle mass is your primary objective, carry out this action.
Use auxiliary movements to reinforce your strength improvements and focus on your smaller muscles as you finish your workout. You might plan to include additional accessory workouts when you want to gain muscle or just because you like variety.
These are two possible workout formats: one for strength training and the other for muscle hypertrophy training (sets and reps are not shown here, but they are covered later).
Upper-Body Push Day Example
- Barbell Bench Press
- Barbell Overhead Press
- Neutral-Grip Dumbbell Bench Press
- Half-Kneeling Dumbbell Overhead Press
- EZ-Bar Skull Crusher
- Dumbbell Rear Delt Flye
- Side Plank
Leg Workout Example
- Front Squat
- Romanian Deadlift
- Reverse Lunge
- Leg Extension + Leg Curl Superset
- Standing Calf Raise
- Hanging Leg Raise
4. Choose Your Sets and Reps
The term “repetitions,” sometimes known as “reps,” refers to the quantity of times you do an exercise. How many times you perform those repetitions is called a set. For example, you would curl the weight ten times, rest, and repeat twice more if a program instructed you to perform three sets of ten reps for biceps curls.
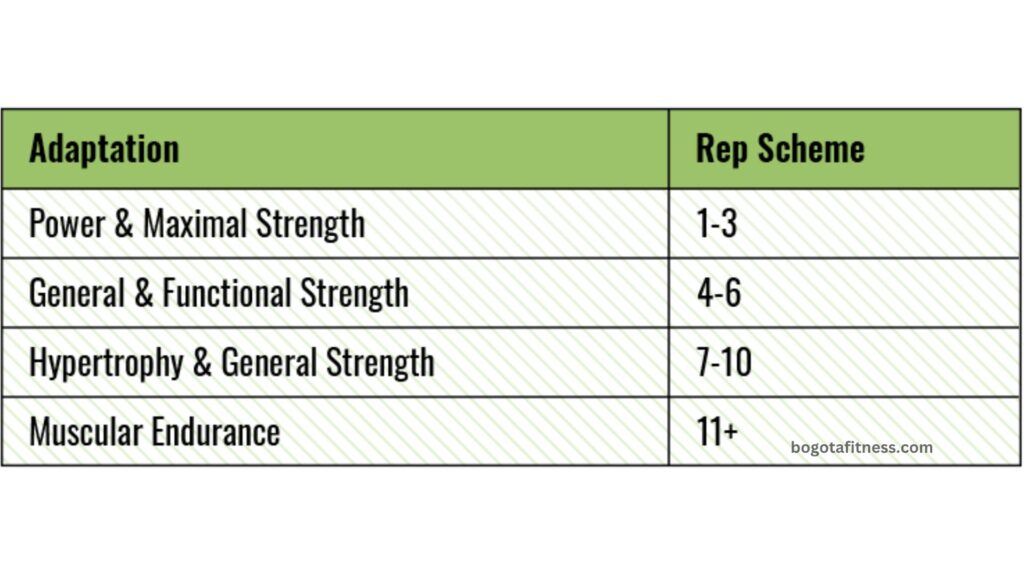
Some objectives call for particular rep ranges. A reduced rep range gives you the strength to lift more weights. Working in the six to twelve rep range can provide you with adequate time under tension to build muscle. Aim far higher and you should see gains that are more focused on endurance. View our representative chart above.
Rest Between Sets
However, it’s not just about how many repetitions you perform. A well-designed program must include rest, which can also serve as a teaching aid. When pursuing a goal, you can monitor progressive overload by keeping note of your rest periods.
For example, you can improve your muscle endurance by taking shorter breaks between sessions. Monitor your sleep duration to see how much better you get over time.
The overall rest intervals shown here are an excellent starting point, but there are several methods to determine how much time you should spend resting. These ranges will allow the body’s energy systems enough time to recuperate while also matching how they react to different movements and intensities.
- Compound Movements: 2 to 4 minutes
- Accessory Movements: 45 seconds to 90 seconds
Resting for shorter durations does not make you less cool, nor does resting for longer durations make you less fit. When performing compound motions with really heavy weights, allow your body to recover appropriately in between sets.
If you can, try to maintain the brief rest intervals when utilizing lighter weights and auxiliary motions. When you initially start a program, three to four sets are usually a decent place to start. Additionally, those rest periods add up, so be sure to factor that in when scheduling your gym time.
5. Learn How to Progress
You’ve planned out your routine, selected your exercises, and determined the sets and reps for each. You also have a goal in mind. That’s fantastic. Now, though, you must make sure that your workouts are becoming better because if they aren’t, you won’t advance. This brings us to progressive overload: the technique of gradually increasing the difficulty of your workouts with each session.
Although there are several techniques to advance, the two most popular ones are to increase the number of repetitions and/or weight you lift.
Here’s an easy illustration: Let’s say you are curling a 60-pound barbell for three sets of ten repetitions. Work out with three sets of eleven reps the next time. Perform three sets of twelve reps, followed by thirteen reps. Increase the weight of the barbell by five pounds after four weeks of increasing the rep count. Then, begin again with three sets of ten reps.
You can use that technique on all of the exercises in your beginner program. You’ll discover new strategies to push beyond plateaus and up your intensity as you get more expertise.
A Word on Intensity
The weight on the bar and the number of repetitions you complete during a lift serve as indicators of your intensity. This word will be used frequently, and for good reason—intensity affects your sets and reps, total training volume, and recovery periods, among other aspects of your workouts.
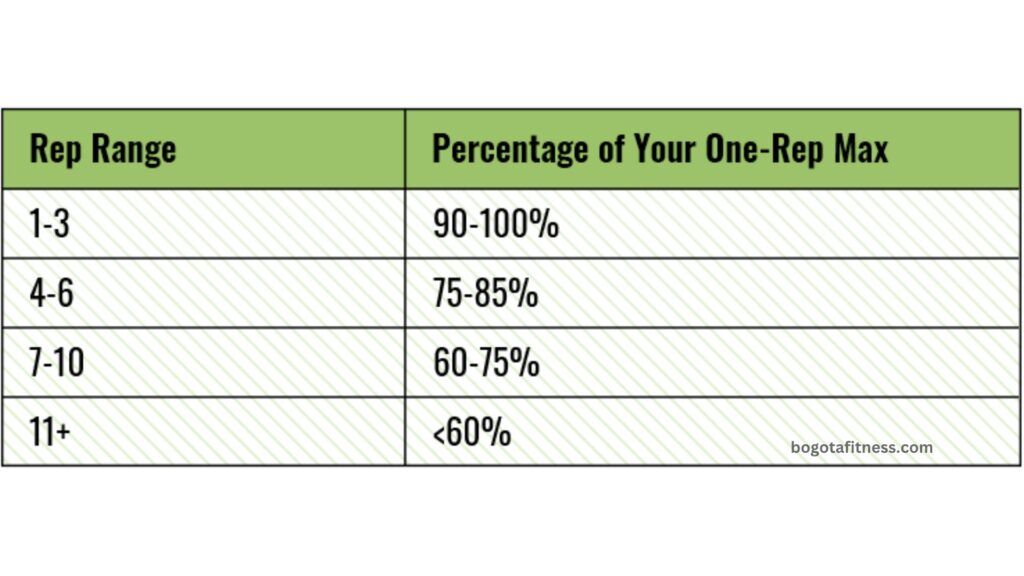
The number of repetitions you complete and the weight on the bar are inversely correlated. You’ll execute fewer reps the more weight you lift, which is usually expressed as a percentage of your one-rep max.
However, intensity isn’t the same as gaining more weight alone. Both a strong one-rep max squat and a 20-rep squat training set can be quite strenuous, and they both need plenty of recovery in between sets. Recall that a heavy lift performed for a short period of time can necessitate just as much rest as a lesser lift performed for a longer period of time.
6. One-Rep Max Calculator
Use the one-rep max calculator on BarBend to help you determine how intense you should be. You can determine the weights to utilize for your first training regimen here. You can use this calculator to determine where you are as a novice, as you probably won’t be genuinely maxing out, and then develop your programming from there.
Generally speaking, your lifting % will be higher the lower your rep range is. Thus, you will execute four to six repetitions at a greater percentage, about 75 to 85 percent of your maximum number of reps. On the other hand, you will often use 60 percent or less of your maximum when performing more than 11 repetitions.
7. Put It All Together
It’s time to start building—also known as the enjoyable part—once you comprehend the many movements and variables that make up a sound program.
Full disclosure: Those that participate heavily in a particular strength sport, such as strongman or CrossFit, should probably look elsewhere. This post is meant to assist athletes in creating a basic training template.
However, the abilities you acquire here can be expanded upon and used to more specialized training plans for different sports.
Choosing a Timeline & Periodization Scheme
Training timelines can be divided into three cycles, or blocks, when designing or periodizing your program. These three are called a mesocycle (middle), macrocycle (overview), and microcycle (smallest).
These timelines, cycles, or blocks will be used by coaches to assist them tailor their exercises to the needs, objectives, and sport of each athlete. Having said that, it’s beneficial to comprehend everything clearly and know how to apply it to your own situation. View the illustration shown below.

Although there are many different kinds of periodization algorithms, a linear model is frequently the most suitable for novices. This model will facilitate steady, measured growth over a long period of time.
The month-long mesocycle in the sample program that follows will have a program that matches the linear periodization model. It consists of four weeks of workouts that gradually increase the difficulty of each activity in the program.
Sample Workout Plan Template
This is a template for a skeleton training program that will require you to work out three times a week. You have the option to add a day, and should you decide to do so, you may want to consider using an upper/lower split.
Instructions: Complete each exercise one at a time. On the other hand, as a superset, exercises denoted with the same letter (“C1” and “C2”) ought to be done consecutively without a break. Your objective is to complete the specified number of sets and reps, modifying the weights if necessary if you discover that this is either too simple or too difficult. Don’t forget to take a day off in between training sessions.
Note: The exercises indicated below are not available. That’s intentional. It is up to you to select the workouts that will best suit your training objectives. This template just provides set and rep counts; it does not tell you where to add in compound or supplementary movements. Think about this homework, but it’s the kind that will make you look bad.
Week One
Day One — Leg Focus
- A1. Lower Compound: 4 sets of 6 reps / 70% 1-RM
- B1. Lower Accessory (unilateral focus): 3 sets of 8-10 reps
- C1. Lower Accessory: 3 sets of 12-15 reps
- C2. Core Accessory: 3 sets of 15-20 reps
- D1. Weighted Core Accessory: 2 sets of 10-12 reps
Day Two — Upper Body Focus
- A1. Upper Compound: 5 sets of 5 reps / 70% 1-RM
- B1. Upper Accessory: 4 sets of 8-10 reps
- C1. Upper Accessory: 3 sets of 6-8 reps
- C2. Upper Accessory (optional: arm focus): 3 sets of 10-12 reps
- D1. Upper Accessory (arm focus): 3 sets of 6-8 reps
- D2. Core Accessory: 4 sets of 10-15 reps
Day Three — Lower Body Focus
- A1. Lower Compound: 3 sets of 5 reps / 75% 1-RM
- B1. Lower + Back Accessory: 3 sets of 6-8 reps
- C1. Lower + Back Accessory: 3 sets of 10-15 reps
- C2. Upper Accessory: 3 sets of 6-8 reps
- D1. Weighted Core Accessory: 4 sets of 8-10 reps
Week Two
Day Four — Leg Focus
- A1. Lower Compound: 4 sets of 6 reps / 72.5% 1-RM
- B1. Lower Accessory (unilateral focus): 3 sets of 8-10 reps
- C1. Lower Accessory: 3 sets of 12-15 reps
- C2. Core Accessory: 3 sets of 15-20 reps
- D1. Weighted Core Accessory: 2 sets of 10-12 reps
Day Five — Upper Body Focus
- A1. Upper Compound: 5 sets of 5 reps / 72.5% 1-RM
- B1. Upper Accessory: 4 sets of 8-10 reps
- C1. Upper Accessory: 3 sets of 6-8 reps
- C2. Upper Accessory (optional: arm focus): 3 sets of 10-12 reps
- D1. Upper Accessory (arm focus): 3 sets of 6-8 reps
- D2. Core Accessory: 4 sets of 10-15 reps
Day Six — Lower Body Focus
- A1. Lower Compound: 3 sets of 5 reps / 77.5% 1-RM
- B1. Lower + Back Accessory (ideally back focus): 3 sets of 6-8 reps
- C1. Lower + Back Accessory: 3 sets of 10-15 reps
- C2. Upper Accessory: 3 sets of 6-8 reps
- D1. Weighted Core Accessory: 4 sets of 8-10 reps
Week Three
Day Seven — Leg Focus
- A1. Lower Compound: 4 sets of 6 reps / 75% 1-RM
- B1. Lower Accessory (unilateral focus): 3 sets x 8-10 reps
- C1. Lower Accessory: 3 sets of 12-15 reps
- C2. Core Accessory: 3 sets of 15-20 reps
- D1. Weighted Core Accessory: 2 sets of 10-12 reps
Day Eight — Upper Body Focus
- A1. Upper Compound: 5 sets of 5 reps / 75% 1-RM
- B1. Upper Accessory: 4 sets of 8-10 reps
- C1. Upper Accessory: 3 sets of 6-8 reps
- C2. Upper Accessory: 3 sets of 10-12 reps
- D1. Upper Accessory (arm focus): 3 sets of 6-8 reps
- D2. Core Accessory: 4 sets of 10-15 reps
Day Nine — Lower Body Focus
- A1. Lower Compound: 3 sets of 5 reps / 80% 1-RM
- B1. Lower + Back Accessory (ideally back focus): 3 sets of 6-8 reps
- C1. Lower + Back Accessory: 3 sets of 10-15 reps
- C2. Upper Accessory: 3 sets of 6-8 reps
- D1. Weighted Core Accessory: 4 sets of 8-10 reps
Week Four
Day 10 — Leg Focus
- A1. Lower Compound: 4 sets x 6 reps / 77.5% 1-RM
- B1. Lower Accessory (unilateral focus): 3 sets x 8-10 reps
- C1. Lower Accessory: 3 sets x 12-15 reps
- C2. Core Accessory: 3 sets x 15-20 reps
- D1. Weighted Core Accessory: 2 sets x 10-12 reps
Day 11 — Upper Body Focus
- A1. Upper Compound: 5 sets of 5 reps / 77.5% 1-RM
- B1. Upper Accessory: 4 sets of 8-10 reps
- C1. Upper Accessory: 3 sets of 6-8 reps
- C2. Upper Accessory (optional: arm focus): 3 sets of 10-12 reps
- D1. Upper Accessory (arm focus): 3 sets of 6-8 reps
- D2. Core Accessory: 4 sets of 10-15 reps
Day 12 — Lower Body Focus
- A1. Lower Compound: 3 sets of 5 reps / 82.5% 1-RM
- B1. Lower + Back Accessory (ideally back focus): 3 sets of 6-8 reps
- C1. Lower + Back Accessory: 3 sets x 10-15 reps
- C2. Upper Accessory: 3 sets of 6-8 reps
- D1. Weighted Core Accessory: 4 sets of 8-10 reps


